 |
|||||||||||
|
|
|||||||||||
| compas j2ee - installation instructions | |||||||||||
|
|
NOTE: For releases prior to 0.9.5, such as
0.90-end2end-beta, you need to follow the old installation and
running instructions, available
here. COMPAS currently works with any application server that implements the JMX Remote API (JSR 160). All major application server vendors have announced support for JSR 160, including IBM Websphere, BEA Weblogic, JBoss and JOnAS. Current status: Since only JOnAS has a fully working and documented implementation of JSR 160, COMPAS has only been tested with it so far. It is however trivial to change the working server in COMPAS, by changing a few values in a COMPAS configuration file. Weblogic 9.0 final release already has full support for JSR 160 but the current beta release does not fully support the basic JMX spec (to be corrected in the final release). JBoss 4.x will soon include support for JSR 160 as well. Installing COMPAS J2EE is straightforward. The following steps must be followed:
1. Obtaining and unpacking COMPAS J2EE Get the latest version and unzip it to a location of your choice (which we will refer to as COMPAS_HOME). 2. Obtaining the required libraries The following open-source packages must be available in order for COMPAS to run. Follow the links to download them.
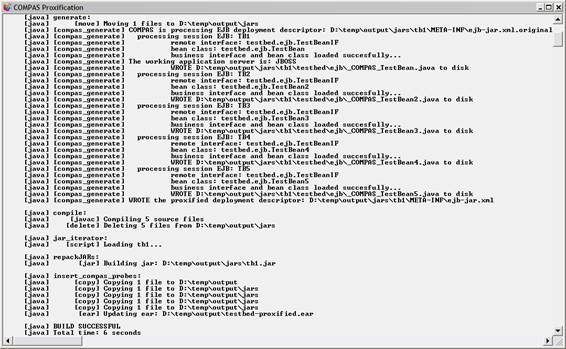
The easiest way to install the Ant dependencies is to copy the respective jars (bsh-version.jar, bcel-version.jar, bsf.jar) into the lib directory under ANT_HOME (the Ant installation directory). This way they will be loaded automatically by Ant. Note that the required Xerces libraries are available with the newer versions of Ant so they do not need to be downloaded anymore. In addition, the JMX reference implementation and the JMX Remote reference implementations need to be installed. Both are freely available from Sun at: http://java.sun.com/products/JavaManagement/download.html 3. Configuring the required COMPAS properties Edit the build.properties and compas-env.conf files to correspond to your environment. These files are located in COMPAS_HOME and COMPAS_HOME/resources respectively. An example of build.properties follows. It is used to set locations for jars and directories corresponding to libraries required by the distribution building and instrumentation operations. # COMPAS properties The compas-env.conf file specifies startup options and JMX connection properties. Some of the JMX properties have different values from server to server. Others correspond to server installation properties, such as host name and port number. The following example corresponds to the JOnAS application server (tested with v.4.3.4). All servers that support the JMX Remote API are supported though. Weblogic 9.0 properties are present in the file but are commented out since the current beta version of 9.0 does not support registering custom JMX MBeans, an essential requirement of COMPAS. In the final 9.0 release, this problem will be solved, and will be able to use those values to connect to Weblogic. # COMPAS: the execution environment properties file 4. Installing the COMPAS probes COMPAS can automatically inject monitoring probes into an existing J2EE EAR archive. You might already have an EAR deployed onto your application server. COMPAS will generate another EAR from your original EAR (target EAR). The generated EAR can then be deployed onto the application server, in place of the original EAR. The instrumentation.properties file is used to specify the names and locations for the target and instrumented EARs. An example follows: #COMPAS Instrumentation Properties Generating an instrumented version of your EAR implies running the insert_probes ant task found in the ant script build.xml. A batch file is provided on windows to simplify setting the required environment variables and classpath. Run run-generation.bat to install the probes in the target EAR. The output will be similar to the screenshot below.
The COMPAS distribution contains the jtimer library binaries for Windows and Linux in COMPAS_HOME/lib/jtimer_native. Since the timestamps are collected on the server side (from within the EJB containers), you must make these libraries available in the system path of the machine(s) running the application server. Therefore, you must copy or add the COMPAS_HOME/lib/jtimer_native folder to the system path. An alternative way of achieving the same result is using the -Djava.library.path property in the application server's startup script (you must locate the list of JVM arguments used when launching the server) to point to COMPAS_HOME/lib/jtimer_native. 6. Configuring The Alert Threshold The alerting mechanisms in COMPAS are still experimental and are based on threshold values. The threshold can be configured currently by placing a custom value in the C:\compas_alert_threshold.conf (currently only available for Windows-based application servers) file, such as:#temporary configuration file to specify the alert threshold for
compas probes If you have correctly set the properties files, you should be able to run the COMPAS Client (on the same machine or on a remote machine with respect to the application server). Running COMPAS implies running the run task found in the ant script build.xml. A batch file is provided on windows to simplify setting the required environment variables and classpath. Run run-compas.bat to start-up the COMPAS Client GUI. |
||||||||||
|
© 2005 Adrian Mos |
|||||||||||


